Sale!

T1N Sprinter Van Aluminess Front Bumper 2002-2006

$2,549.95$2,649.71

Description

T1N Sprinter Van Aluminess Front Bumper 2002-2006

This product is compatible with all Sprinter Vans made between 2002-2006. This includes both the 2500 and the 3500 versions. 

We have various Aluminum Bumpers for the T1N Sprinters

CHECK OUT the RDC Bumper  https://www.t1nparts.com/product/t1n-sprinter-van-front-winch-bumper/

These are made to order. Please allow 6-8 weeks

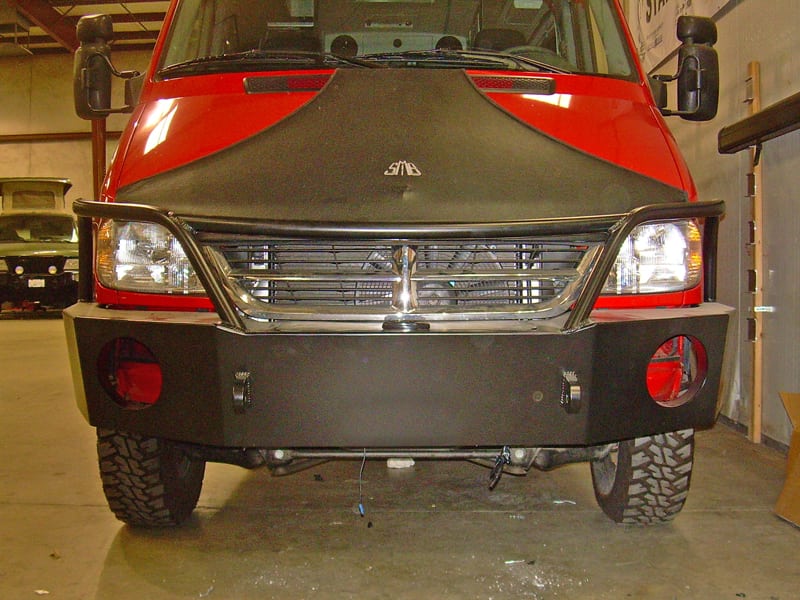
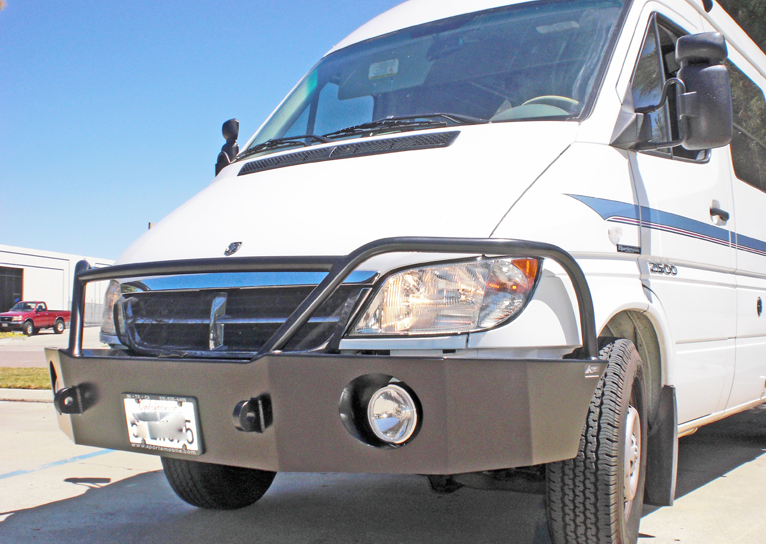
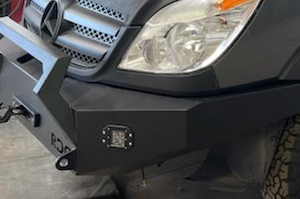
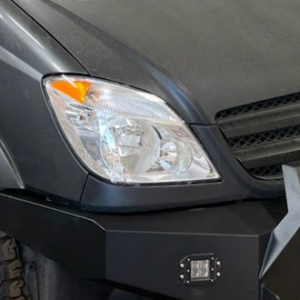
T1N Sprinters are great vehicles for traveling. They have a ton of room and can be converted to motorhomes or mobile garages. The big drawback is their fragile front end. With the T1N Aluminess front bumper, Sprinters finally have the protection they need from wildlife.

They have a toolbox built-in for extra storage of those items you don’t want inside. They weigh only 90 pounds and are designed to fit the sleek lines that the T1N Sprinter is known for. Aluminum tubing that won’t rust.

Aluminess Products -Sprinter Van 2003-2006 Front Winch Bumper

All front T1N winch bumpers now have vents and the Aluminess “A” Cut into the front.

Standard bumper configuration is round lights and 1.5” Brush Guard

Products shown with available options. T1N Lights, shackles, receivers, and brush guard crossbars not included in standard bumper price.

Shackle mounts are no longer available for this bumper due to the Sprinter’s frame design

(Front Bumper) INSTALLATION INSTRUCTIONS______
03-06 Dodge T1N Sprinter
Please read before beginning
 Stainless steel hardware may bind together
when tightening—It is recommended that you
apply an anti-seize assembly T1N lubricant to the
threads of each bolt before assembly
 This installation requires two people
Required tools
 Standard wrench set
 Leveling tool
Included hardware Quantity
 Mounting hardware
o 70102 – Bolt Hex Head M8-12 5×65 no shoulder 6
o 70101 – Nut, Hex, M8 – 125 Grade 10.9 6
o 70020 – 5/16 washer SS 6
o 10111 – Washer, Splitlock 5/16, zinc 6
Installation Instructions
REMOVAL OF STOCK BUMPER:
1. Remove 2 bolts from behind license plate. (See photo A).
2. Remove 2 plastic clips located inward from steps on each side.
3. Carefully slide bumper forward and away from vehicle.
4. Remove steps.
INSTALLATION OF ALUMINESS BUMPER:
5. Carefully slide bumper on and attach with 2 supplied T1N bolts.
6. Align bumper in center of vehicle with equal gaps on both sides as well as equal
space between top of bumper and bottom trim of van. Tighten bolts enough to
hold bumper from moving.
7. Hold supplied brackets in place as shown in photo B and mark back plate of
bumper to be drilled. Double check that bumper is sitting level (not tilting
forward or backwards.
8. Remove T1N bumper, then drill marked bracket holes and bolt brackets loosely to
bumper.
9. Re-install bumper and align per step 6. Tighten front bolts.
2
10. Tighten bracket bolts, then drill thru frame and install and t

Additional information

Weight 50 lbs
Dimensions 48 × 12 × 12 in
Brush Guards

With Brush Guards, Without Brush Guards

Reviews

There are no reviews yet.

Only logged in customers who have purchased this product may leave a review.

You may also like…